The tree pose is one of the first balancing poses that you will be introduced to when starting yoga. Also known as “Vrksasana” (vrik-SHAHS-ana) in Sanskrit, the tree pose in yoga provides us with many benefits, despite its simplicity.
While improving our balance, posture, and hip flexibility, the steadiness of the pose helps with improving your mind’s focus and clarity. With “vrksa” meaning “tree,” the pose aims to achieve the steadiness and strength of a tree trunk.
This article will explore the range of benefits of the tree yoga pose and provide you with a clear tutorial on how to practice it correctly.
How to do the tree pose: A step-by-step guide
Warm up
Before diving into any pose in yoga or physical activity, it is essential that your body is warm in order to prevent injury. Here are a few poses you can do to prepare the hips, core, and mind for the tree pose in yoga.
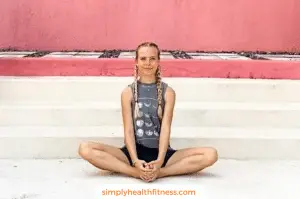
Butterfly Pose (Badhakonasana):
Take a seated position and bring your heels together as close to your body as your knees will allow. Keep your spine long and tailbone reaching to the floor as you use your legs to push your knees lower down. You will feel a deep stretch in the hips and inner thighs here. Stay in this pose for 5-10 breaths.
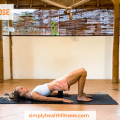
Boat Pose (Navasana):
From seated, lean your upper body back, while keeping the spine straight. Engage your core by tucking your belly button in before you lift your legs off the floor, at a diagonal position. Now your body should be in a V-shape. Either keep your legs together and straight or with your knees bent, and try to balance by reaching your arms in front of you. Hold for 5 breaths and repeat a few more times to fire up your core.

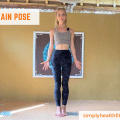
Mountain Pose (Tadasana):
This pose will help your mind and breath get “in the zone.” Start by standing with your feet together, legs straight, tailbone slightly tucked, shoulders relaxed, and looking forward. Feel the earth with your feet by pressing all your toes to the floor and equally distributing the weight in your feet, while keeping your arches off the floor.
Make sure that your knees are relaxed, your shoulder blades are leveled, and that your chin isn’t poking forward. All these alignment cues will help with setting up for practicing tree pose, and will also force you to check in with your own posture. Take at least 10 deep breaths here.

The Tree Pose
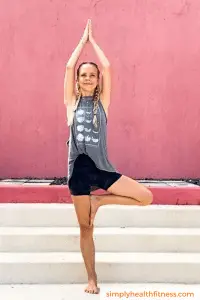
From the mountain pose, take your hands to your hips, and focus your eyes at one point ahead of you.
Bend your right knee to slowly bring your right foot off the floor, and turn your knee outwards in order to open up your hip.
Place your right foot inside your standing leg, either on your left ankle, calf, or inner thigh.

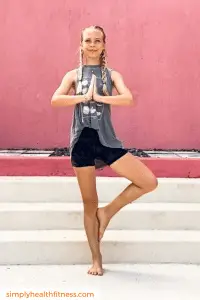
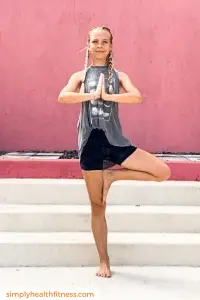
Keep your left leg strong and your left toes pointing straight, while your right foot pushes on the inside of your standing leg.
Make sure that your hips are at the same level, your core is engaged, and your shoulders are relaxed. If your hips are not square, then take your right knee inwards slightly to take the weight out of your left hip.
Bring your hands together in prayer position, to your heart center or above your head, toward the ceiling, and take 5-10 breaths.
Simply step back to the mountain pose to exit, and then repeat on the other side.
Check out my easy to follow video on how to do each step of the pose:
Counter Poses
When you have practiced the tree pose enough, then take some counter stretches to loosen any of the tension you may have. Counter poses that stretch the spine, glutes, and legs will be most relevant after the tree pose.
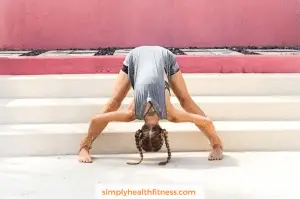
Wide Legged Forward Fold (Prasarita Padottanasana)
From standing, take your feet wider than hip-distance. Take your heels behind your toes and hinge from your hip to reach the floor. You can keep your hands on your hips or ankles if you can’t reach the floor, but make sure the spine is long to feel the stretch.
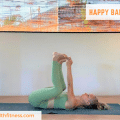
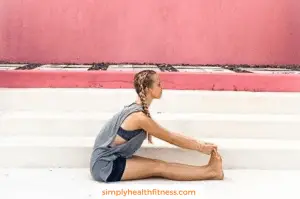
Seated Forward Fold (Paschimottanasana)
Sit down with your legs straight in front of you. Make sure that your weight equally distributed in your sitting bones and tailbone. Flex your feet so that your legs are active, and hinge from your hips to fold forward.
It is more important to keep your spine long and shoulder blades pulling away from your ears rather than collapsing down in the fold. Hold it for 10 breaths while you feel a nice back decompression and deep stretch in the backs of your legs.
Tips and Tricks
Focal Point
The “Drishti” refers to the yogic gaze and is the point where to set your eyes. It helps you focus and hold your intention during your practice. In the tree pose, the gaze is important for keeping your balance as well. Therefore, focus on a still, unmoving object or point in front of you while you perform this asana.
Take Your Time
Whether you are a beginner or an advanced practitioner, it is important to always take your time when getting into a pose. Follow the breath and let your focus and calmness guide you. Remember, the more you rush, the fewer benefits you get out of the practice.
Check-In with your Alignment
It is normal to fall or lose balance when you are doing yoga, regardless of your level; perhaps you want a chair or wall next to you if you are trying a new pose. A few points to pay attention to during the tree pose:
- The weight is equal throughout your heel, sole, and toes in your standing foot
- Hips are square and level with each other
- Shoulder blades are at the same level and relaxed away from your ears
- There is a micro bend in your knee of your standing leg
- Your belly is tucked in
Variations of The Tree Pose
Once you are more comfortable with practicing tree pose, there are a few variations you can take in order to switch it up and challenge yourself.
- Close your eyes
- Move your gaze around
- Take your hands over your head
- Sway your upper body from side to side
Take it Further
Once you feel ready to take the pose even further, you can challenge yourself with even more advanced poses that are related to the tree pose.
- Half Bound Lotus Standing Forward Bend (Ardha Baddha Padmottanasana)
- Warrior III (Virabadrasana III)
- Extended Hand to Big Toe Pose (Uttita Hasta Padungustasana)
- Dancer’s Pose (Natarajasana)
Common Mistakes and Risks
When you are unfamiliar with some of the key alignment cues in yoga, you will sometimes find yourself doing some mistakes that can hurt your joints and muscles.
Not engaging the core muscles is very common throughout any physical exercise, and can be dangerous for the lower back – activate your core by tucking your navel in towards your spine.
Not squaring your hips can be damaging to your joints, so make sure that you are not leaning into your hip on the standing side.
A postural tip is to have your knees relaxed or have a micro bend to prevent your knee from hyperextending when you are standing. To further protect your knee joint, avoid placing your foot directly on the side of your standing leg’s knee, but rather below or above it.
Like with any physical exercise, make sure that you don’t do anything that a professional hasn’t approved of if you suffer from an injury or are recovering from surgery. In the tree pose, be extra careful if you have issues with your ankle, knee, and/or shoulders.
If you experience dizziness or a tingling sensation when you take your arms above your head, then keep your hands at the heart center.
Finally, if you are in your final trimester of pregnancy, make sure that your lower back is healthy and keep your tailbone tucked in if you attempt this pose; with the extra weight of the baby, maybe you want to have a chair or wall next to you to help you balance.
Key benefits
Improves body posture
The tree pose tests your balance, so you must have strong and engaged core muscles. Furthermore, they help increase your body awareness to also strengthen your posture and maintain alignment.
Because it is a unilateral pose, you are able to work on one side at a time, which can help you strengthen the weaker side of your body and notice any crookedness you may have in your alignment. Read more about this here.
There are many benefits to having a healthy posture, not just in fitness, but in your everyday life. Postural alignment helps protect your muscles, joints, and ligaments because your body doesn’t need to compensate in awkward places.
This strength in your posture helps with preventing injury and promoting healthy aging in the long term. As we age, our muscle fibers, joints, and bones begin to weaken, which is why yoga is one of the best, more gentle forms of exercise to stick to as we age.
Stretches your hips
The tree pose also offers a hip stretch, because you are forced to open your hip in order to place the foot inside the standing leg. With so many hours spent sitting in cars or in front of screens, we are getting more tight in the hips, which can lead to tension and pains throughout the body.
The psoas (hip) muscle connects our legs to our torso, which means it is incredibly linked to the upper body. With tightness in the hips, our core weakens and can create back and shoulder pains – common with people living more sedentary lives.
Helps with clarity of mind and focus
On the more spiritual aspect, the energy flowing in the sacral area is also linked to our creativity and passion. By opening up the energy system (“chakra”), in the hips, we can loosen up emotional tension and stress in order to give access to our freedom to creatively express and feel pleasure in things.
With our mind and body so interconnected, it is definitely worthwhile to appreciate and learn about the additional benefits we receive as we consciously move our body with the power of yoga.
If you need more convincing, tennis champion, Novak Djokovic, even said that yoga has helped him as an athlete to keep “an optimal state of mind and have peace and calm in life.”
Final Thoughts
With the correct alignment and posture, you will find the tree pose with more ease. Once you have practiced this pose and gotten used to balancing on one leg, you will set yourself up for a whole world of new standing postures to practice in yoga.
Do not underestimate the power of yoga to build strength with simply just the weight of your body. You will find that your legs, glutes, and core muscles will strengthen without having to hit the gym. With such a myriad of benefits that consistent yoga practice will give you, there is no reason not to start – no matter your level.