The bridge pose is extremely relevant in today’s modern world, and one that we should all familiarize ourselves with. It is beginner-friendly and helps counteract the many hours we spend hunched over computer screens.
The bridge pose or “Setu Bandha Sarvangasana” (SET- too-BAHN-da-sharv-vahn-GAHS-uh-na) – Sanskrit name, is a full-body movement that provides a multitude of benefits to the mind and body. Broken down, you can see that the word literally defines the posture as a full-body bridge-looking pose.
- “Setu:” bridge
- “Bandha:” lock
- “Sarya:” all
- “Anga:” limbs
- “Asana:” pose
The locked bridge position provides us with a stretch that opens the chest, hips, and shoulders while also working the back, glutes, and inner thigh muscles. It positions our body in a way that calms the mind, which is why it helps with our daily stresses as well.
You can practice the bridge pose as a preparation for deeper backbends or adjust it for restorative purposes.
In this article, I will provide you with a simple tutorial on how to enter the bridge pose safely, as well as more advanced poses for those who wish to deepen their pose.
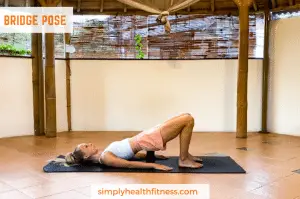
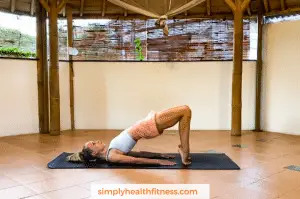
How to do the Bridge Pose
The Bridge Pose (Setu Bandha Sarvangasana)
1. Lie on your back with your knees bent and hip width apart.
2. Place your feet flat with your heels close to your glutes. Your heels should be close enough to be able to reach your ankles.
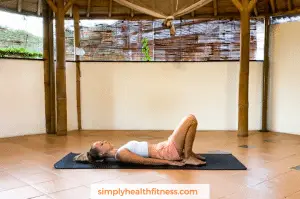
3. With your arms straight and along the sides of your body, place your palms facing down onto your mat. Relax your shoulders, keep your arms firm, and feel your shoulder blades press the floor equally.
4. On an inhale, engage your back muscles, inner thighs, glutes, and hamstrings as you lift your hips up. There should be a diagonal line from your hip bones, down to your shoulders.
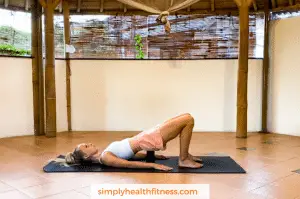
5. Keep your gaze looking up, your knees pointing toward the ceiling, feet flat, and your toes facing forward.
6. Deepen the pose by pressing your arms and palms down more to lift the space between your shoulder blades – you can even interlock your fingers in the space below your bridge.
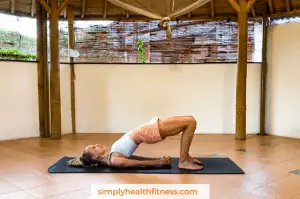
7. Hold this pose for a few breaths, or as long as your hips don’t begin to sag down.
8. Exhale as you release your pose. Imagine that your spine is a string of pearls, as you slowly roll it down vertebrae by vertebrae.
Check out my video tutorial for more tips on how to do the Bridge Pose:
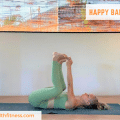
Counter Stretches
Once you have performed this exercise, it is important to do some counter stretches to decompress the back muscles and joints. Hold each of these poses for 5-10 breaths.
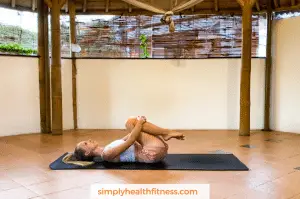
Supine Figure 4
Lie on your back, keep your left knee bent and place your right ankle just above your left knee in a figure of 4. Work towards a 90-degree angle with your right knee and try to grab your left shin with both hands to deepen the stretch in your right glute. Repeat this exercise with your other leg.
Supine Twist
Stretch out your left leg and flex your foot. Hug your right knee into your chest as you take your right knee over to the left side and keep your gaze to the right. Make sure both shoulders are touching the floor to keep your spine long and twisted. You can place your left arm on your right knee and plant your right arm over to the right side for more stability. Repeat this with the other leg.
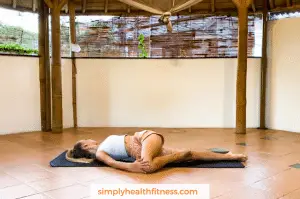
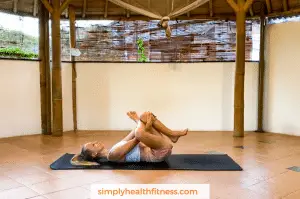
Knees to chest
Hug both knees to your chest as you relax your shoulders and neck. Rock side to side and back and forth if you want to give your back muscles and spine a massage.
Perfect the Bridge Pose
Modifications
There are a few modifications and variations that you can do with the bridge pose, depending on what you wish to achieve with your practice.
Close your eyes
By simply closing your eyes, you take the pose more inward and increase your mind to muscle connection. You become more centered as you take away the visual distractions and begin to focus more on what your body is feeling while you work the bridge pose.
Lift your heels
Start by lifting your heels when you are in the full bridge pose, and take your tippy toes closer towards you. This begins to challenge the backs of your legs more and tests your back muscles’ ability to hold the weight of your hips.
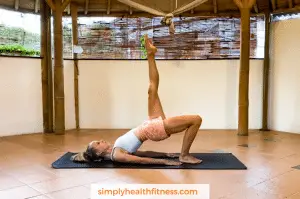
Lift one leg
While keeping your hips leveled, play with lifting one leg at a time. By simultaneously keeping your hips squared as you shift your weight, this variation tests your balance and ability to maintain proper form.
Advanced Yoga Poses
Once you have increased your strength and flexibility in your key muscle groups related to bridge pose, you can try to enter more advanced poses that use similar pressure points. For these poses, make sure that your lower back, spine, and neck are healthy enough to avoid injury.
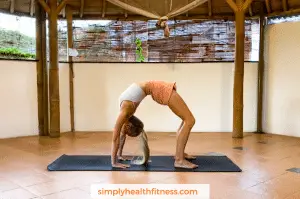
Full Wheel Pose (Urdhva Dhanurasana)
From the bridge pose starting position, take your hands underneath your shoulders. Keep your feet flat, with your elbows pointing straight up, and press them against the floor to lift the hips (keep engaging your back muscles, glutes, and hamstrings). You can leave the crown of your head on the floor to start with, or you can push yourself all the way up by using some more arm strength.
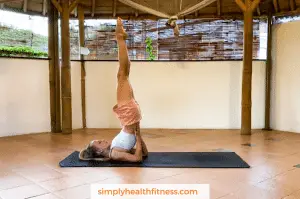
Shoulder Stand (Salamba Sarvangasana)
From bridge pose, place your elbows underneath your back and place your palms just above your tail bone. When your weight is in your palms, arms, and shoulders, lift your hips up to take your legs off the floor. Try to straighten your knees and point your toes to the sky.
Risks and Common Mistakes to Avoid
No matter the exercise you do, it is important to take caution, especially if you suffer from injuries. If you are recovering from any surgeries, or have just given birth, consult with your doctors before attempting any type of exercise. Avoid backbends and the bridge pose if you have injuries in the spine, lower back, neck, or shoulders.
Take note of your alignment in this pose to prevent improper form and injury. A common mistake people do in this pose is to over-engage the glutes and inner thighs, which can lead to compressing the back and hurt your knees. Check that you have your feet flat and parallel to your knees, as they may have a tendency to lean inwards/outwards, if this happens you can squeeze a yoga block between your thighs.
Instead of working towards height in the bridge pose, it is better to keep your hips below your knees to protect your back. Finally, keep the weight in your shoulders and gaze forward so that you are protecting your neck joint.
Key Benefits
Physical Benefits
The bridge pose is a beginner-friendly backbend that is great for strengthening your back and leg muscles. It also helps build a strong core and improves your posture. The hold at the final position of this pose uses the strength of major muscle groups like your glutes and inner thighs.
This pose is great for stretching out your front body, namely the chest and hips, which can get compressed from being hunched over computer screens and sitting for long hours.
Restorative Benefits
The bridge pose offers the strength to go deeper into other poses, or it gives the opportunity to do a restorative pose. By placing a bolster or block underneath your sacrum (the area just above the tailbone) and letting your weight rest there, you turn the pose into a passive one.
Restorative yoga poses activate the parasympathetic nervous system by calming the body and breath. Deactivating the pose puts the body into a position that allows it to rest and recover.
Final Thoughts
The bridge pose is a subtle way to slow down your mind. It’s a great time-out from our fast-paced world and it invites you inward for some deep thinking which can be refreshing at the end of an exhausting day. Close your eyes and get lost in thought as this gentle stretch releases any tension that may have built up throughout the course of the day.