If you’re looking to elevate your pancake game, then you’ve come to the right place. In this comprehensive guide, we’ll show you how to create the most delicious and fluffy pancakes using evaporated milk.
Whether you’re a pancake enthusiast or just looking to switch up your breakfast routine, this recipe is sure to impress. So, let’s dive in and discover the magic of evaporated milk pancakes!
What is Evaporated Milk and Why Use it in Pancakes?
Before we delve into the recipe, let’s first understand what evaporated milk is and why it’s the secret ingredient to achieving tender and flavorful pancakes.
Evaporated milk is created by simmering regular milk until around 60% of its water content evaporates. This process gives the milk a thicker consistency and a slightly caramelized flavor. The result is a rich and creamy liquid that adds a unique depth of flavor to any recipe.
When it comes to pancakes, evaporated milk works wonders. Its creamy texture enhances the overall tenderness of the pancakes, while its subtle sweetness adds a delightful touch without the need for additional fat or sugar. So, if you’re looking to take your pancakes to the next level, using evaporated milk is the way to go.
The Perfect Pancake Recipe with Evaporated Milk
Now that we understand the magic of evaporated milk, let’s dive into the recipe. Here’s everything you need to create the most irresistible evaporated milk pancakes:
Ingredients:
- 2 cups all-purpose flour
- 4 tsp baking powder
- 1/8 cup granulated sugar
- Pinch of salt
- 1 3/4 cups evaporated milk
- 1 egg
- 1 tsp vanilla extract
- 2 tbsp butter (for frying)
Evaporated Milk Pancakes Recipe
Step 1
In a large mixing bowl, whisk together the flour, baking powder, sugar, and salt. Ensure they are well combined.
Step 2
In a separate bowl, whisk together the evaporated milk, egg, and vanilla extract until the mixture is thick and smooth.
Step 3
Pour the wet ingredients into the dry ingredients and stir until just combined. Be careful not to overmix, as this can result in dense pancakes.
Step 4
Heat a non-stick pan or skillet over medium heat. Add a tablespoon of butter and swirl it around to coat the pan evenly.
Step 5
Using a ladle or measuring cup, pour approximately 1/4 cup of batter onto the hot pan for each pancake. Allow the pancakes to cook until bubbles form on the surface and the edges start to set.
Step 6
Carefully flip the pancakes using a spatula and cook for another minute or until they are golden brown on both sides.
Step 7
Transfer the cooked pancakes to a plate and cover them loosely with foil to keep them warm while you cook the remaining batter. Repeat the process until all the batter has been used.
Step 8
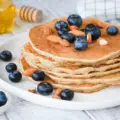
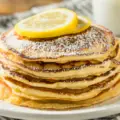
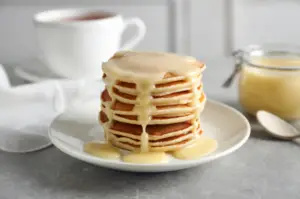
Serve the pancakes warm with your favorite toppings, such as maple syrup, fresh fruits, or a dollop of whipped cream. Get creative and experiment with different combinations to find your perfect pancake experience.
Now that you have the recipe, it’s time to start cooking and enjoy the delectable flavors of evaporated milk pancakes. But before you do, let’s explore some tips and tricks to ensure your pancakes turn out perfect every time.
Tips for Perfect Evaporated Milk Pancakes
Creating the perfect pancakes is an art, but with these tips, you’ll be well on your way to pancake perfection:
1. Measure Ingredients Accurately
Accurate measurements are crucial for achieving the right consistency in your pancakes. Use measuring cups and spoons to ensure you’re adding the correct amount of each ingredient.
2. Don’t Overmix the Batter
Overmixing the batter can result in tough and dense pancakes. Mix the wet and dry ingredients until they are just combined, leaving some lumps in the batter. This will yield light and fluffy pancakes.
3. Adjust the Heat
Finding the right balance of heat is key to achieving evenly cooked pancakes. Start with medium heat and adjust as needed. If the pancakes are browning too quickly, lower the heat, and if they’re taking too long to cook, increase the heat slightly.
4. Grease the Pan
To ensure your pancakes don’t stick to the pan, use a small amount of butter or cooking spray before pouring the batter. This will also help create a beautiful golden crust on the pancakes.
5. Take Note of Bubbles and Edges
Pay attention to the bubbles that form on the surface of the pancakes. Once the bubbles start to break and the edges appear set, it’s time to flip the pancakes. This indicates that the first side is cooked and ready to be flipped.
6. Keep Pancakes Warm
While you’re cooking multiple batches of pancakes, keep the cooked ones warm by placing them on a plate covered with foil in a low-temperature oven. This way, you can serve a stack of warm pancakes to everyone at once.
7. Experiment with Toppings
Don’t be afraid to get creative with your pancake toppings. While traditional maple syrup is always a crowd-pleaser, consider adding fresh fruits, a dollop of yogurt or whipped cream, or even a sprinkle of cinnamon sugar for added flavor.
With these tips in mind, you’re now equipped with all the knowledge you need to create the most incredible evaporated milk pancakes. So, gather your ingredients, heat up your pan, and get ready to indulge in pancake heaven.
Variations and Mix-Ins
While the classic evaporated milk pancake recipe is a delight on its own, you can also experiment with different variations and mix-ins to add an extra layer of flavor and texture. Here are some ideas to get you started:
- Buttermilk: Replace the evaporated milk with buttermilk for tangy and fluffy pancakes.
- Chocolate: Add chocolate chips or cocoa powder to the batter for a decadent chocolate twist.
- Fruit: Fold in fresh berries, sliced bananas, or diced apples to add bursts of fruity goodness.
- Nuts: Sprinkle chopped nuts, such as walnuts or pecans, into the batter for added crunch.
- Spices: Add a dash of cinnamon, nutmeg, or pumpkin spice for a warm and cozy flavor.
Feel free to get creative and combine different variations and mix-ins to create your own signature pancake masterpiece.
Storage and Freezing Instructions
If you find yourself with leftover pancakes or want to prepare them in advance, here’s how you can store and freeze them:
Storage:
Place any leftover pancakes in an airtight container or zip-top bag and refrigerate for up to 3-4 days. When ready to enjoy, simply reheat them in the microwave or on a lightly greased pan.
Freezing:
To freeze the pancakes, allow them to cool completely before placing them in a single layer on a baking sheet lined with parchment paper. Place the baking sheet in the freezer for about 1-2 hours, or until the pancakes are firm. Once frozen, transfer them to a freezer-safe bag or container, making sure to remove as much air as possible. The pancakes can be stored in the freezer for up to 3 months. To reheat, simply pop them in the toaster, microwave, or oven until warmed through.