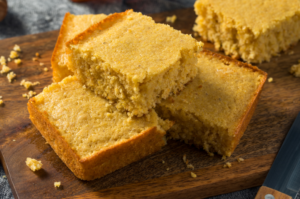
Are you on the lookout for a delectable and nourishing cornbread recipe that caters to your gluten-free and vegan lifestyle? Well, you’re in luck! Today, I’m thrilled to share with you my personal favorite: Gluten-Free Vegan Cornbread.
This delightful twist on the classic recipe combines the rich flavors of cornmeal, the goodness of plant-based ingredients, and the absence of gluten.
Get ready to indulge your taste buds in a warm, fluffy, and golden slice of cornbread that’s both wholesome and satisfying. Let’s get started!
Ingredients
Before we dive into the recipe, let’s gather our essential ingredients. Here’s what you’ll need:
- 1 cup gluten-free cornmeal
- 1 cup gluten-free all-purpose flour
- 1 tablespoon baking powder
- 1/2 teaspoon baking soda
- 1/2 teaspoon salt
- 1 cup unsweetened almond milk (or any other plant-based milk)
- 1/4 cup maple syrup (or your preferred liquid sweetener)
- 1/4 cup melted coconut oil (or any other vegetable oil)
- 1 tablespoon apple cider vinegar
- Optional: 1/2 cup corn kernels for added texture and flavor
Gluten free vegan cornbread recipe
Now, let’s embark on the journey of creating this delightful gluten-free vegan cornbread. Follow these simple steps for guaranteed success:
Step 1 – Preparing the Batter
Preheat your oven to 375°F (190°C) and lightly grease an 8-inch square baking dish with some coconut oil or use parchment paper for easy removal.
In a large mixing bowl, combine the gluten-free cornmeal, gluten-free all-purpose flour, baking powder, baking soda, and salt. Mix them well, ensuring all the dry ingredients are evenly incorporated.
In a separate bowl, whisk together the almond milk, maple syrup, melted coconut oil, and apple cider vinegar until well blended.
Pour the wet mixture into the dry ingredients and stir until a smooth batter forms. If desired, gently fold in the corn kernels to add some delightful pops of flavor and texture.
Step 2 – Baking the Cornbread
Transfer the batter into the prepared baking dish, spreading it out evenly.
Place the baking dish in the preheated oven and bake for approximately 20-25 minutes or until the cornbread turns golden brown on top and a toothpick inserted into the center comes out clean.
Once baked, remove the cornbread from the oven and let it cool in the baking dish for a few minutes.
After cooling slightly, carefully transfer the cornbread onto a wire rack to cool completely before slicing and serving.
Expert Tips
Achieving the perfect gluten-free vegan cornbread requires a few expert tips and tricks. Take note of these valuable suggestions to ensure outstanding results:
For a moist and tender cornbread, avoid overmixing the batter. Stir until the ingredients are just combined to prevent any toughness.
Experiment with different gluten-free flours to find your preferred blend. A mix of brown rice flour, tapioca flour, and potato starch often yields excellent results.
To enhance the flavor, consider adding a touch of herbs like thyme, rosemary, or even a sprinkle of nutritional yeast for a cheesy twist.
If you prefer a sweeter cornbread, increase the amount of maple syrup or add a tablespoon of coconut sugar to the batter.
FAQs
Is there a substitute for maple syrup?
Certainly! If you don’t have maple syrup on hand or prefer a different liquid sweetener, you can use alternatives such as agave nectar, brown rice syrup, or even date syrup. The goal is to add a touch of sweetness to complement the cornbread without overpowering its flavors.
Can I omit the corn kernels?
Absolutely! The addition of corn kernels is optional in this recipe. If you prefer a smoother texture, feel free to omit them. The cornbread will still turn out deliciously moist and flavorful.
How should I store the gluten-free vegan cornbread?
To keep your cornbread fresh, store it in an airtight container or wrap it tightly with plastic wrap. It can be kept at room temperature for up to 2-3 days. If you’d like to extend its shelf life, refrigerate it for up to a week or freeze it for up to three months. Just remember to thaw it before enjoying.