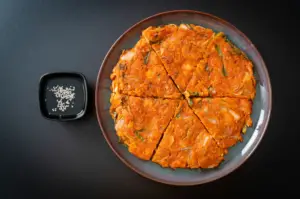
If you’re a fan of Korean cuisine, you’re probably familiar with the mouthwatering delight that is kimchi pancake. Traditionally made with all-purpose flour, these savory pancakes are a staple in Korean households. However, for those following a gluten-free diet or looking for a healthier alternative, there’s good news – you can enjoy the deliciousness of kimchi pancake without compromising your dietary needs.
In this article, we’ll explore the world of gluten-free kimchi pancakes, including their ingredients, cooking techniques, and a delectable dipping sauce to complement their flavors.
The Allure of Kimchi Pancake
Kimchi pancake, also known as kimchijeon, is a beloved Korean dish that combines the tangy, fermented flavors of kimchi with a crispy pancake exterior. It’s a delightful fusion of textures and tastes – crispy on the outside, soft and chewy on the inside. The umami-rich kimchi adds a depth of flavor that is both satisfying and addictive. Traditionally served as an appetizer or a side dish, kimchi pancake has gained popularity worldwide for its unique taste and versatility.
Going Gluten-Free: The Quest for a Healthier Pancake
For individuals with gluten sensitivities or those following a gluten-free diet, finding alternatives to traditional recipes can be challenging. Fortunately, with a few simple substitutions, you can create a gluten-free version of kimchi pancake that is equally delicious and satisfying. By replacing all-purpose flour with a combination of chickpea flour and tapioca flour, you can enjoy the flavors of kimchi pancake without the worries of gluten.
Gluten-Free Ingredients for Kimchi Pancake
To make gluten-free kimchi pancake, you’ll need the following ingredients:
- 1/2 cup Napa cabbage kimchi, chopped
- 1 tablespoon Kimchi juice
- 2 small or 1 large Scallions, chopped
- 1/3 cup Chickpea flour
- 1/4 cup Tapioca flour
- 1/2 cup Water
- 1/4 teaspoon Brown sugar
- 1 tablespoon Cooking oil, divided into halves
The Art of Making Gluten-Free Kimchi Pancake
Now that you have gathered all the necessary ingredients, it’s time to dive into the process of creating gluten-free kimchi pancake. The following step-by-step guide will help you achieve the perfect balance of flavors and textures.
Step 1: Prepare the Vegetables
Start by chopping the scallions and kimchi according to your preference. You can choose to chop them into larger pieces for added texture or smaller pieces for a smoother pancake.
Step 2: Create the Gluten-Free Batter
In a mixing bowl, whisk together the chickpea flour, tapioca flour, and brown sugar. Slowly add in the water while stirring the mixture until it becomes smooth and free of lumps. Fold in the kimchi juice, chopped kimchi, and scallions, ensuring that the batter is easily spreadable and thin. If the batter appears too thick, add a small amount of water to achieve the desired consistency.
Step 3: Cook the Pancake
Heat half of the cooking oil in a non-stick pan over medium-high heat. Pour the batter into the pan, spreading it evenly to cover the entire bottom. The amount of batter used will depend on the size of your pan and your personal preference. Let the pancake cook until the edges firm up and change color, approximately 3-4 minutes.
Step 4: Flip and Crisp Up
Carefully scrape around the edge of the pancake to loosen it from the pan. Once the bottom is golden and crispy, slide a spatula under the pancake and flip it over. Drizzle the remaining cooking oil around the edges of the pan to ensure that the other side becomes equally crispy. Continue cooking for approximately 3 minutes until the pancake is golden brown.
Step 5: Slice and Serve
When the pancake is fully cooked, transfer it to a cutting board and slice it according to your preference. You can opt for traditional triangular slices or experiment with different shapes. Serve the gluten-free kimchi pancake hot with the accompanying dipping sauce for a burst of flavor.
The Perfect Dipping Sauce: A Burst of Flavor
No kimchi pancake is complete without a delicious dipping sauce to complement its flavors. This simple yet flavorful sauce enhances the overall taste experience. Here’s how to make it:
Gluten-Free Dipping Sauce Ingredients
To create the perfect dipping sauce, you’ll need the following gluten-free ingredients:
- Soy sauce 1 tablespoon
- Coconut aminos 1 tablespoon
- Rice vinegar 1 tablespoon
- Red Thai chili pepper 1 small, chopped
- Green chili pepper 1 small, chopped
- White sesame seeds 1/2 teaspoon
Preparing the Dipping Sauce
In a small bowl, mix together the soy sauce, coconut aminos, rice vinegar, chopped chili peppers, and white sesame seeds. Adjust the spiciness of the sauce to your liking by adding more or fewer chili peppers. The sauce should have a savory, umami flavor with a hint of sweetness.
Gluten-Free Kimchi Pancakes: A Versatile Dish
Gluten-free kimchi pancake is a versatile dish that can be enjoyed in various ways. Whether you serve it as an appetizer, a side dish, or a main course, it’s sure to impress your taste buds. Here are a few ideas for enjoying your gluten-free kimchi pancake:
- As an Appetizer: Serve small triangular slices of kimchi pancake as an appetizer at your next gathering. Your guests will love the unique flavors and crispy textures.
- As a Side Dish: Pair your kimchi pancake with other Korean dishes like bibimbap or bulgogi for a complete and satisfying meal.
- As a Main Course: Create a kimchi pancake wrap by placing a slice of pancake on a lettuce leaf, adding some fresh vegetables and protein of your choice, and wrapping it all together.
- For a Korean Feast: Plan a Korean-themed dinner and include gluten-free kimchi pancake as one of the star dishes. Serve it alongside other Korean favorites like kimchi fried rice and japchae for a memorable meal.
Additional Tips for Perfect Gluten-Free Kimchi Pancake
To ensure the best results when making gluten-free kimchi pancake, keep the following tips in mind:
- Use a generous amount of oil to create a crispy crust on both sides of the pancake.
- Allow one side of the pancake to cook thoroughly before flipping it over. This will ensure a crispy exterior and a soft interior.
- Drizzle a bit more oil around the edges of the pancake after flipping to ensure even crispiness.
- Experiment with different sizes and shapes of pancakes to add visual appeal to your dish.
- Adjust the spice level of the dipping sauce to suit your taste preferences.